

1 Introduction
RESTful API uses HTTP requests to GET, PUT, POST and DELETE data.
This document is intended for developers.
2 General
GuardPoint10 introduces a RESTful API that is based on the ODATA protocol to retrieve information from
GuardPoint10 and create actions within GuardPoint10 access control.
The API is divided into the following sections:
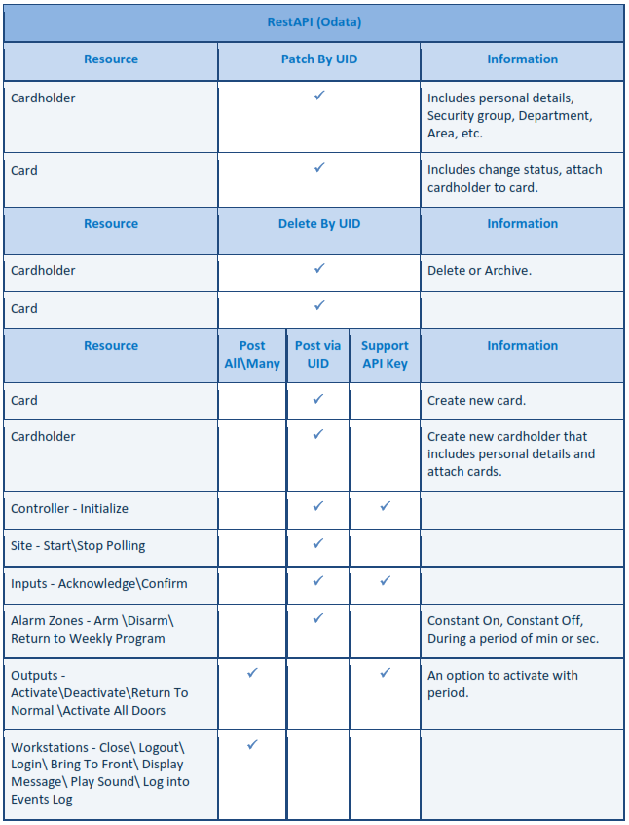
- Management: Includes management resources such as Cardholders, Badges, etc.
- Access control: Includes commands related to relays, polling, controllers, initialization, etc.
- GuardPoint10 software control: Includes GUI related actions such as open screens, log in/out, etc.
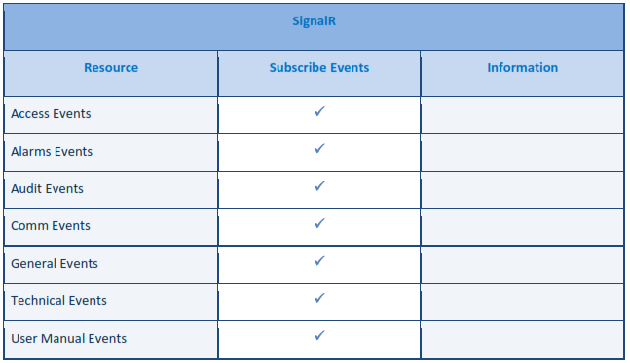
- Monitoring: Includes resources for handling events received from the GuardPoint10 environment.
The API is built with dot.net core 2.1 and is hosted as a Windows service.
3 ODATA
The ODATA protocol is extensive and exposes a wide range of tools in various languages to make
communication easy and streamlined. ODATA basics can be found here.
The protocol provides a very simple and standard method to consume RESTful queryable API.
4 Push events (SignalR)
Events from GuardPoint10 will be pushed to API clients through SignalR, which is an open source technology (lead by Microsoft) and has clients in all major platforms and technology.
More information about SignalR can be found here.
5 Postman
5.1 Introduction
To make the integration easy, we are shipping the API with a Postman collection of examples and tests.
This is the main resource for the API documentation.
The Postman tool is a free tool for managing RESTful API call collections in various conditions and can be used as the API descriptive doc and testing tool. The Postman tool and tutorials can be found here.
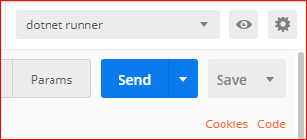
In Postman, you will have an environment setting options. The default setting should be dotnet runner for the correct post of the API service. See the attachments to this article: API Center and dotnet runner (import into postman)
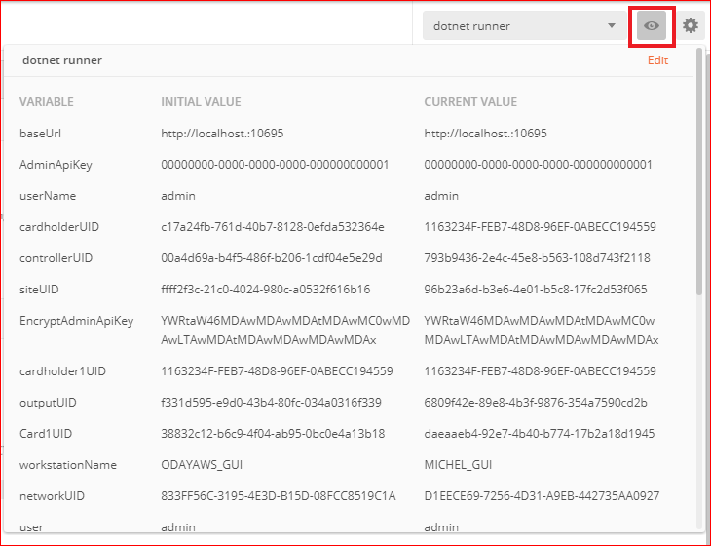
5.2 Understanding Environment Variables for Testing
For easy understanding and testing of the GuardPoint10 API, we use Environment variables.
These variables allow you to run a swift testing set for each entity.
After getting one or more entities (GET), the UID is set in the environment variable.
This variable will be used by default for every next operation that needs some UID.
The Postman syntax of the variable is {{xxx}} (e.g. {{cardholderUID}}).
You can edit any variable or add a new variable to adapt the tests to your needs.
The environment variables can be displayed and edited from the top right part of the screen.
6 Start working with APIs
The API Center communicates with GuardPoint10 via our AcsServer.
To use the API Center, verify that all are Services are running (AcsServer, AcsNmService, AcsApiServer).
You can open an GuardPoint10 GUI to get feedback on operations. However the does not require an open GUI
in order to work. As long as the GuardPoint10 services are running on the GuardPoint10 Server installation, the API Center can communicate with your system.
To facilitate working with the API, we added a Postman collection of demo URLs.
These URLs show the different options and a Visual Studio solution that demonstrates using the API from .net.
7 API Key vs UID
The following two options are used to identify resources:
API key: A user-controlled string that can be added through the GuardPoint10 UI (needs to be enabled in the GuardPoint10 Users screen).
This option exists for a few specific main resources (i.e.controllers, relays, etc.).
An API key can be used in a few actions and can be used to filter resources.
UID: A unique identifier (GUID) for every instance of a resource (i.e. cardholders, inputs, badges etc.).
A UID can be used everywhere.
8 Authentication and Authorization
All API call headers should contain a standard “Authorization” header with the username and a user-specific
API key. In addition, this user should be authorized by GuardPoint10 to use the API.
The Authorization setting is found in the Users screen.
After installing the Full GuardPoint10 version (GuardPoint10 Server installation), perform the following steps to
allow the API Center to communicate with the GuardPoint10 Server.
- Go to the Users Screen.
- Choose the user that will be connected to the API Center (e.g. admin).
- Set Allow API to Yes
- Generate or enter a unique GUID (e.g. 00000000-0000-0000-0000-000000000001) other than 00000000-0000-0000-0000-000000000000) and Save.
- Launch to Postman.
- Click the Environment quick look button at the top right of the screen.
- Set the ApiAdminKey to the same GUID as the one saved in the Users screen (in the current value column) and set the user to the same value found in the Users screen’s User name field.
9 Translation (Multilanguage)
The API is not translated by default so the response messages are in English with error codes to help with translation. Also, the controller type names are displayed in English.
10 Http Status Codes
The API uses the general HTTP status code conventions as shown here.
11 Available Operations

12 Troubleshooting
Response 401 - not authorized. To resolve, check that the user credentials in GuardPoint10 match those sent via the API.
Comments
0 comments
Please sign in to leave a comment.